

Professional Portal Guide
Need help with some of our Professional Portal features?
Welcome to the Professional (Pro) Portal Guide!
Our development team had one objective in mind when designing the Pro Portal: giving you the opportunity to guide as many clients as you want in just a few minutes.
We’ve worked hard to ensure GoGet.Fit is easy to use. But just in case, we’ve put together some quick pointers to help you keep your clients moving!
If you can't find the answer to your question then please feel free to contact us. We're always here to help!

Getting Started
Getting up and running is quick and simple. We will have you and your clients connected and moving in no time.
Let us guide you through the first steps.
1. Sign Up
You will need to receive an invitation to use the professional (pro) portal. There are subscription fees to use the pro portal. Please contact use to get an invitation or to find out more about the subscription fees. info@gogetfit.com
Once you’ve received your invitation, click on the link and fill in your information.
What will you do with my location?
Your location information allows other Go Get Fit Pros to refer local clients to you. Potential clients may be looking for a Go Get Fit Pro to work within your service area.
Why do you need my phone number?
Because we value the foundation upon which your practice is built, we may require pros to verbally confirm a client transfer before it is completed. Your professional contact information allows healthcare providers to reach out and discuss details regarding a client they'd like to refer to you.

2. Build Your Dream Practice
Invite clients. Simple!
OR
Give them your unique access code for efficiency
How do I do invite a client?
When you're logged-in to the Pro Portal, click on 'ADD CLIENT'. Here you can enter your client's name and email address.
We fire off a personalized GoGet.Fit invite to the email address you entered.
Once your client registers (using the email address you sent the invite to), you'll be connected!
Your clients will need the invitation code, included in the email received, to move forward with their registration.
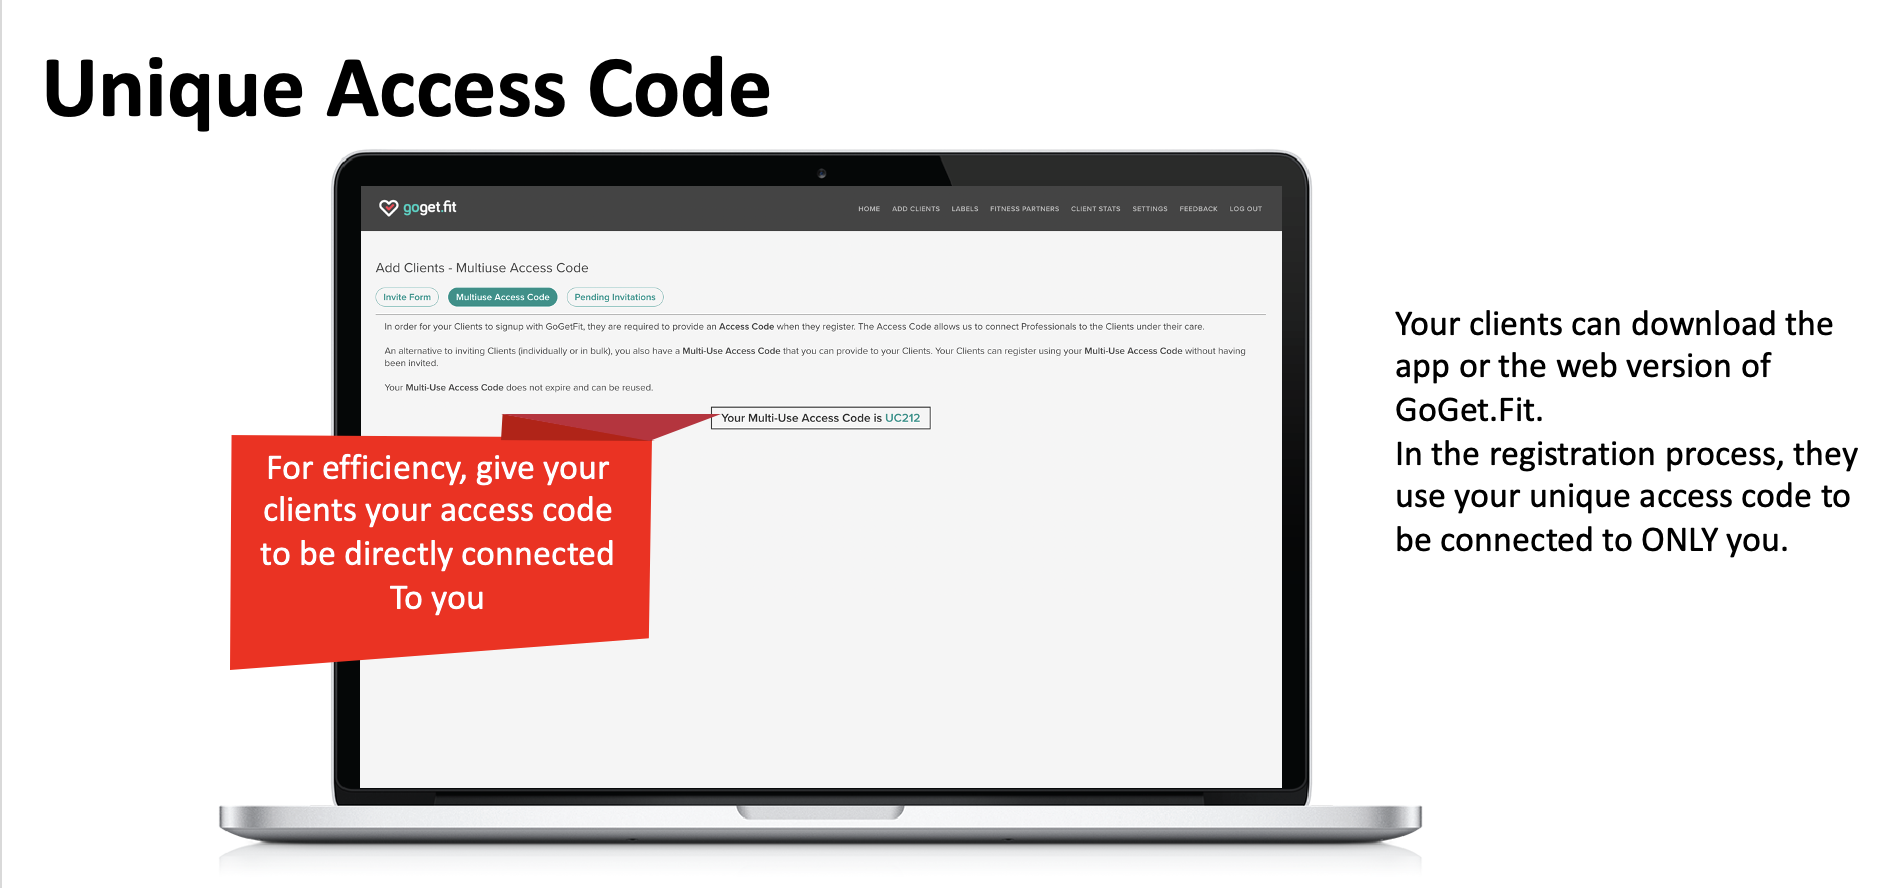
Where do I find my unique access code?
Under the add a client, hit the Multi use Access Code button, here you will find your unique access code.
By giving this code directly, you don’t need to email your clients an invitation to sign up for GoGet.Fit.
This is great when you’re registering large groups of users at once
Welcome to your Home Page
This is your core work space - where the magic happens! From here, you can view client workout data, individually or as a group. The data presented here has been aggregated and analyzed to give you a quick overview of each client's progress.
There are two navigation bars on the home page.
The main navigation bar (at the top of the page), allows you to explore various Pro Portal features. This menu is at the top of every page.
The client navigation bar is visible only on the home page - where your clients are filtered into different categories.
The Pro Portal Home Page captures the results of all your clients' workout details. It takes one glance to determine which clients need the most guidance.

The term ‘client’ refers to those who are using Go Get Fit in a non-professional capacity to form new exercise routines. Users must commit to a certain number of workouts, for a total number of minutes, per week when signing up with Go Get Fit. The number committed, as it compares to the workouts completed, is displayed for each user you are monitoring.
Users are grouped into categories based on their level of engagement. There are three levels of engagement that represent clients' adherence to their exercise commitment. These three categories are described in more detail below.
ENGAGEMENT CATEGORIES
Why are engagement categories important to you?
Engagement levels divide your users into 4 sub categories, based on how well they did compared to their goals. This provides a quick and clear picture for you of all of your users categorized according to their past week’s success.
The opportunity: One message (you select or create) to each category, generic but relevant, and GoGet.Fit personalizes it to each user in that category.
Your advantage: In only minutes all users reviewed, & supportive messages sent.
*Please note that if you are using the labels feature, your users in that label, can be sorted into the different engagement levels.

How Clients are grouped in the Trainee Navigation Bar
All Clients: This is where all your clients are listed.
Low Engagement: These clients have completed less than 25% of their activity commitment for the week. This group requires your personal attention. You can easily send them a group message, urging them to book an appointment with you as soon as possible. Early intervention is the backbone of success!
Moderate Engagement: Clients in this group may have had an off week, completing between 26-74% of their commitments. Nothing to worry about yet, but consider sending them a message of encouragement.
High Engagement: This group is meeting, or exceeding, their activity goals: completing at least 75% of their commitments. Send them a thumbs up acknowledging their success!
Disengaged: Users who have neglected to schedule a workout for 3 weeks or more are assigned to the Disengaged category. If you have clients in this category, it's best to contact them personally to book an appointment.
New: Clients who have just registered spend 2 weeks in this group, while we gather enough data to sort them into one of the three main categories.
Pending: This is a list of the clients you've invited to GoGet.Fit. While listed here, you know they have yet to register with GoGet.Fit. You are waiting for them to activate their account by signing up.
When you click on a user's name, you'll be presented with the details of that client's workout history (over the past 8 weeks). These workout details are presented in a graph for quick reference. Clients have the option of entering their mood and perceived effort when logging their completed activity. ENCOURAGE them to do this, as it allows us to provide you with valuable information regarding the habits of your overall client population.
PENDING AND NEW USERS
PENDING CLIENTS
Once you've invited your potential clients, they'll be added to the Pending list (on the home page, click "Pending" to view this list). The dates displayed here follow this format: month/date/year. If you wish to send another invitation to someone on this list, you can do so by clicking on "Resend". If you no longer wish to send someone a GoGet.Fit invite, you can delete an individual by clicking on the "Delete" button.
If you don't immediately see the person you've just invited, try clicking on the refresh button located to the right of the "Pending" button.

NEW USERS
When clients accept your invitation, and register with Go Get Fit, they'll be added to the "New" list (on the home page, click "New" to view this list). Users will remain on the "New" list for 2 weeks, then they'll be assigned to a category based on their level of engagement. Users are listed chronologically, with the newest listed first.

LABELS
Why are labels important to you?
Large numbers of clients can be overwhelming. “Labels” provide a way to place all of your users into sub categories for easier management. For example, if you have two grade 10 classes, you can have each class in separate labeled groups.
On your home page, you'll find a column on the far left with this title: "Filter By Label". Your home page loads all your users when you first login. You can group your users according to labels that you create. Start by clicking on the LABELS link in the menu at the top of your home page.


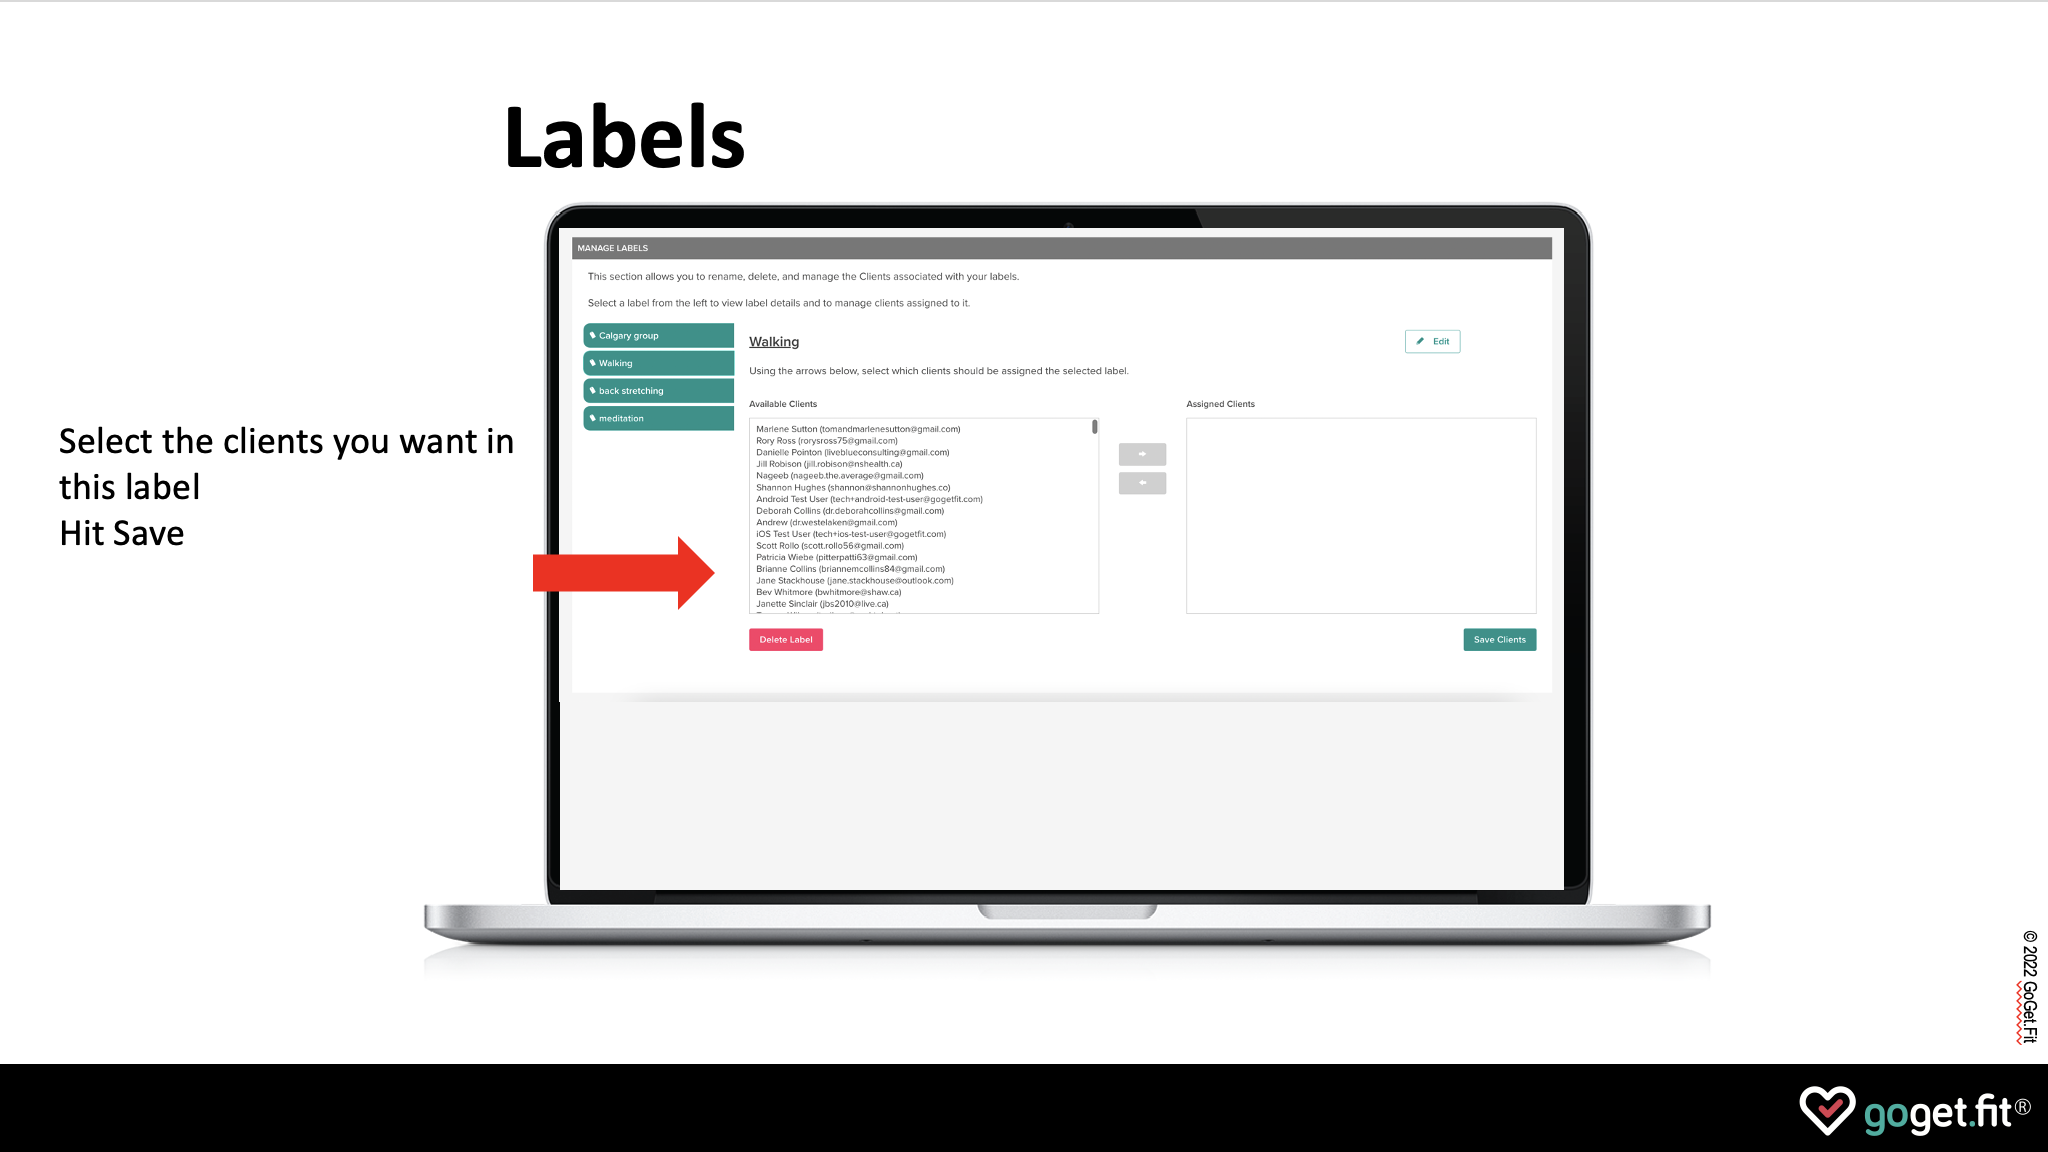
Manage Your Labels
1 - Create a label
Type the name of the group into the label name.
Hit SAVE
2 - Once you've created a label, for example "Walking Class",
You can then select from the list of available users you want to add to that group. (Note, an individual user can be added to multiple groups.)
Once you've added all the users you want to that group, click on the "Save Clients" button.
3 - Once you are back on the home page, you'll see your labels listed on the left hand side.
If you select one of your labels, you'll be able to see all the users in that group. The group will be further divided by adherence level.
GROUP MESSAGING
Supporting individual clients who are attempting to change their exercise behaviour can be quite time consuming. We have good news for you, Go Get Fit is here to help.
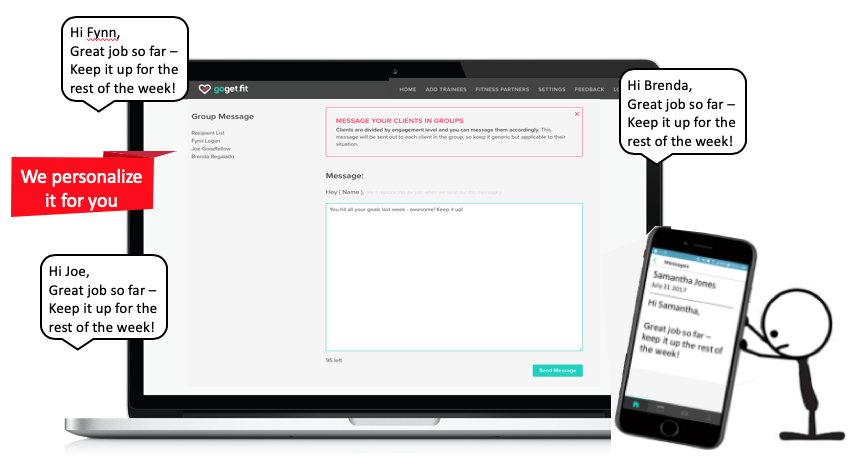
The Group Message feature saves you tons of time. It’s simple. Your Pro Portal presents clients grouped according to engagement level. You tap out a few words - one message - that is sent to users who are all at the same level of engagement. The result: each client receives a personal, motivating message. It took 1 minute to write, now you can move on to your next task.
1. Select an engagement level, for example, the High Engagement category. Simply click "Send a group message".

2. Type your message. We’ve given you 500 characters to let your personality shine. Remember, everyone will receive the same message.

3. Select "Send Message". Go Get Fit adds a personalized salutation from you. Your message will land in the inboxes of everyone who belongs to the High Engagement category.
Want to message just one person?
You can do that too! For more detail see the section on Individual Messages

Clickable Links
Want to send your clients a link for information?
1- Type in the title of the link.
2- Copy and paste the URL into the address link.
3- Send the message
Taking a Closer Look

USER DETAILS
At some point, you may want to take a more granular look at one client’s workout history. Go Get Fit collects this data and presents it clearly so you can quickly review trends over the last 8 weeks. To view this data, click on a client’s name. There are 4 tabs at the top of the user's workout details page. The 4 tabs are: Workouts, Messages, Recommendation, Manage.

Activities
You will find a variety of client-specific information. The GoGet.Fit week begins on Monday and ends on Sunday. We encourage users to get in the habit of logging their workouts and scheduling the next week of activity by Sunday evening. Activity data is organized by week (beginning on Monday) and represented as follows.
The number of workouts or minutes the client has
Committed to each week - the orange line
Scheduled each week - purple circles
Actually completed - blue bar
Further down the page is a detailed summary of workouts for the last 8 weeks, including a description of the activity (e.g., swimming, or walking), as well as the user's mood and effort upon completion. Mood and effort are important to take note of when making new recommendations for exercise.

When users record their workouts, they have the option of entering their mood and effort during the workout. This gives you a quick way to determine how clients are feeling about the exercise they complete.
INDIVIDUAL MESSAGES
Want to message just one person?
Above the personal weekly progress summary, click “Messages”. Type out your message. When you hit “Send” the message will only be received by the client you've chosen. Fuzzy on your previous conversations with that client? Scroll down to see a record of past communication.

EXERCISE RECOMMENDATIONS
Recommendations allow you to suggest a certain number of workouts, for a particular duration of physical activity. You can either enter a unique recommendation, or create a recommendation template that can be used again and again for different users.
Sending a new workout recommendation?
Click on the client you want to send a recommendation to, at the top of the workout details page you'll see a button labelled "Recommendation". When you click on this button, you'll see the "Current Recommendation" above a form that allows you to send a new, customized, recommendation.

Recommend Different Types of Activity
Each recommendation is meant to apply to one full week. Multiple lines can be added to a recommendation so you can guide clients with different types of activity for the week.
Oops! I made a mistake
Did you "Add" a line, then realize you made a mistake? No problem, hit “Delete” to get rid of that line.
You can send your new recommendation by clicking "Send recommendation". Or you can choose one of your Recommendation Templates, by selecting it from the drop-down menu. If you'd like to create a new Recommendation Template, you can click on the "Manage Templates" link in the top right corner.

For more detail on how to create a Recommendation Template, see the CREATING EXERCISE RECOMMENDATION TEMPLATES section.
Pending Recommendation
When you click "Send recommendation", you should see a new "PENDING RECOMMENDATION" listed above. In Go Get Fit, a new week begins on Monday. This means your recommendation will be pending until the Monday following the day it's created.

MANAGE YOUR CLIENTS
This tab is used to Transfer or Release a user. You might need do this if you, or they, are relocating.

It's important for pros to discuss their decisions to Transfer or Release users prior to making that request in the Pro Portal. When making a request to Transfer, the receiving pro must be registered with Go Get Fit. Consent must be obtained from both the receiving pro and the client in order for a transfer request to be completed. All requests for Transfer or Release generally take at least 24 hours for completion.
TRANSFER
Simply enter the first and last name, or email address of the new professional and click “Initiate Transfer”. In order to protect the privacy of users, we also require their consent before a transfer can be completed. One of our Go Get Fit representatives will confirm the transfer with you, as well as the receiving pro. At that time you can let us know whether you'd like to release the trainee once s/he has been transferred to another pro, or continue to monitor the trainee's progress.

Share a client
You have the ability to share your client with another professional. Fill in the other pro’s information to initiate the transfer. The client still has to agree to the transfer. Let them know to watch out for an email from the GoGet.Fit team

RELEASE
If you're unable to to continue working with a client, you can click the "Release Client" button. You will no longer be connected with this client through Go Get Fit.
CONNECTING WITH OTHER PROS
Find your peers and colleagues! Transfer a client, network or share information.
Click on "FITNESS PARTNERS" in the top navigation menu. You can search for a registered Go Get Fit Pro by entering either a name or a city. These search results can be filtered by selecting a professional designation from the drop-down list. When your search results appear, you can click on one to view that pro's contact information.
*Please note, the Fitness Partners feature is only available for certain Go Get Fit Product Packages

SETTINGS PAGE -
(MANAGING YOUR PERSONAL DETAILS)
This is where you can update your personal information.
Edit Details
Please do so when you move, or change your number, so that potential clients and other professionals can easily locate and connect with you. Go Get Fit is not effective if it’s not accurate!

CREATING EXERCISE RECOMMENDATION TEMPLATES

To review your templates, or create a new one, click on "SETTINGS", then "Recommendation Templates".
Your role as a Pro is either to support, or “support & guide” your clients in their pursuit to be active lifelong! To support you in this endeavour, we've designed a feature that allows you to create exercise templates for clients at any stage in their fitness journeys.

Every pro is automatically assigned a default recommendation template upon registration. You can change this by creating a new template and setting it as the default.
The Standard Recommendation Template
All pros are assigned a default Recommendation Template when they register with Go Get Fit. This default template is delivered automatically to any trainee that you invite. It's called the "Standard Recommendation" and it consists of 4 workouts of walking, with a duration of 15 minutes each.

Creating Your Own Basic Recommendation Template
You can create a basic template, that consists of only one workout type.
Give your template a name. When you want to send this recommendation to a trainee, this is the name that shows up in the drop-down list of templates.
Enter the number of workouts, the duration, and the activity.
Click on the "Add" button.
Now you can "Save" the recommendation template. You should see the name of the template in your recommendation list.
Creating an Advanced Recommendation Template
You can create an advanced template that includes two or more types of exercise for the week. Variety is the spice of life! Once they've achieved a regular exercise routine, recommending a combination of different exercise types can help to keep your clients interested and engaged. For example, combinations of resistance and aerobic workouts can be important for clients who are worried about bone density.
Give your template a name. When you want to send this recommendation to a client, this is the name that shows up in the drop-down list of templates.
Enter the first line of the recommendation: the number of workouts, the duration, and a description of the activity (e.g., resistance).
Click on the "Add" button but DO NOT click “Save”, not yet!

4. Enter the next line of your recommendation: the number of workouts, the duration, and a description of the activity (e.g., aerobic).
5. Click on the "Add" button. Your recommendation template will now have two lines. You can repeat this process to continue adding as many lines as you need.

6. Now select "Save" to add this template to your collection.

FEEDBACK
We’re always looking to improve. Please send us your suggestions, comments and well wishes. We love hearing from you!
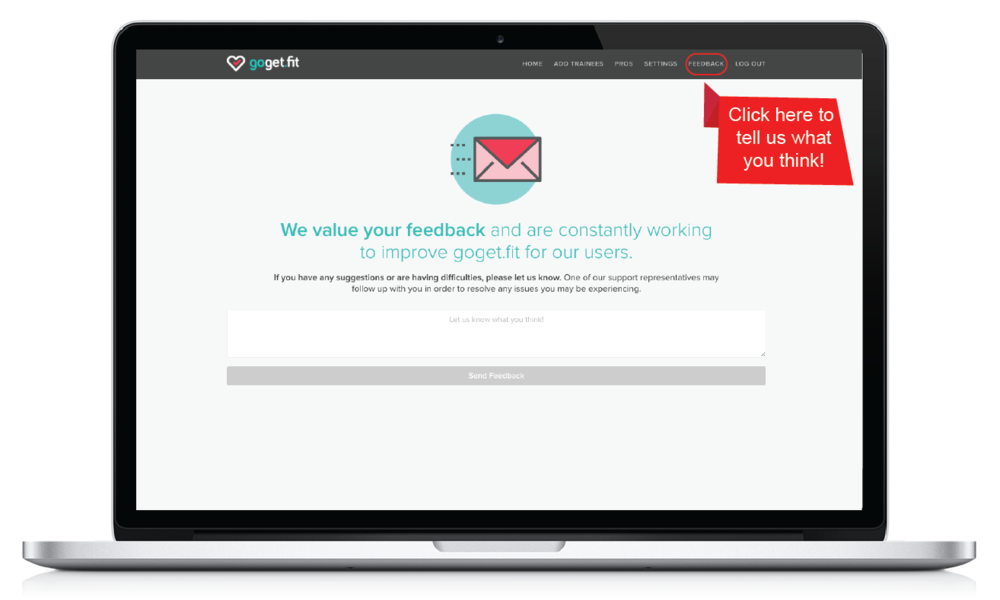
A response from us will usually take no longer than 1-2 business days.

Billable Encounters
For Alberta and Ontario, you can log your billable encounters in GoGet.Fit portal.
There are two ways to do this.
Select the Billable Encounters in the top navigation bar.
Fill in all of the information, date, client name, the billing code and your message.

The second option is to Select Billable encounter when sending a personal message.
This message will go into the “billable Encounter” page (pictured above)
